Klok 2.x
User Manual
mcgraphix Inc. ©2011
Table of Contents
Dragging and Droping Time Entries
Manually Creating Klok Time Entries
Timesheet Duration Time Format:
Creating and Exporting Time Sheets
Introduction
Klok has become one of the leading personal time tracking applications available due to its ease of use, price, features and attractive interface. It has been downloaded over 750,000 times since its initial release.
Klok is currently available in two versions, a Free Version and a Pro version which enables many advanced and enhanced features. Not every option or setting listed is this manual is available in the Free Version. To upgrade your free version please purchase a license key from www.getklok.com
System Requirements
Since Klok runs in Adobe Air, the requirements for Klok are that of Adobe Air
The current system requirements for Adobe Air are listed below (from adobe.com)
Windows
- Intel® Pentium® III processor (Pentium 4 recommended)
- Microsoft® Windows® XP Home, Professional, or Tablet PC Edition with Service Pack 2 or 3, Windows Server® 2003, Windows Vista® Home Premium, Business, Ultimate, or Enterprise (including 64-bit editions) with Service Pack 1, or Windows 7
- 512MB of RAM (1GB recommended)
Macintosh
- Intel Core™ Duo or faster processor
- Mac OS X v10.4, v10.5 or v10.6
- 512MB of RAM (1GB recommended)
Linux
- Intel Pentium III processor (Pentium 4 recommended)
- Fedora Core 12, Ubuntu 9.10, or openSUSE® 11.2
- 1GB of RAM
Note: Windows 2000 and Mac PowerPC are not supported with AIR 2. Users can install and run AIR 1.5 applications, but will not be able to install or update to AIR 2. Mac OS 10.4 running on an Intel processor is supported for running AIR 2 applications, but is not supported as development environment with the AIR 2 SDK.
Download
Klok 2.x is available to download in several locations. We recommend downloading the most recent version of Klok from our website at www.getklok.com
Klok is available from the Adobe Marketplace at (http://www.appup.com/applications/applications-Klok%202%20Pro). Please note that due to the way Adobe approves apps the version at the Adobe Market place may be one version behind the version available from our website.
Klok is also available from other download locations such as www.download.com
Installation
![]()
Klok is an Adobe Air application which means that you will need to download the Adobe Air Run time ( 2.x or higher) at http://www.adobe.com/go/EN_US-H-GET-AIR
You may also use the automatic installer from our website (www.getklok.com). It will install Air if it is not installed before installing Klok.
Windows
To install Klok on a Windows System you have several options. If you do not already have Adobe Air installed on your pc you may use the automatic installed located on our website (http://getklok.com/features.html). On the right hand of this page you will see an Install Image. If you click the image the installer will install Adobe Air and then Klok.
If you already have Adobe Air you may download Klok2.air from any of the above mentioned download locations. Once the air file is downloaded you may simply double click the file to install it.
Linux
To install Klok on a Linux System you must first install Adobe Air. You can get the free download of Adobe Air from Adobe.com. Once Adobe Air is installed you may then download Klok2.air from any of the above mentioned download locations. Once the air file is downloaded you may simply double click the file to install it.
Klok has been tested on Fedora, Centos, and Suse Linux but will likely run on many others.
Mac
To install Klok on a Mac System you must first install Adobe Air. You can get the free download of Adobe Air from Adobe.com. Once Adobe Air is installed you may then download Klok2.air from any of the above mentioned download locations. Once the air file is downloaded you may simply double click the file to install it.
Using Klok
Starting Klok
Once Klok is installed successfully you can open Klok by double clicking its icon.

Once Klok is running you can now start creating Projects and Time Entries associated with those projects.
Projects
Klok allows you to search for projects if your project list has become quite large. To search for projects you enter the first few letters of the project name into the “Find Project” text box located above the proect list. NOTE: At this time the seach box is case sensitive. To clear the search you may click on the small “x” in the search box. ( see the image below)

To get to additions screens for a particular project, double click the project name from the project tree on the left hand side of Klok.
Summary Screen
On the projects Summary screen you will find options to set the project name. This is a required feild. You will also find settings for Billable/Non Billable. This settings allows the time sheets to calculate the cost of the project based on what you have entered in the Hourly Rate for this project.
There is also an option to set the estimated hours for this project with an associated small graph that displays Actual vs Estimated hours to help you determine if you are over or under budget.
Description Screen
On the projects Description screen there is a free form text box that you can add notes about this particular project. This could be used for project details such as contacts for the project, users working on the project, todo lists, or other information.
Properties Screen
You have the ability to have record some additional information for Klok projects.
The Project Name field is a required field. This is what is diplayed in the project list. If your company has custom Project Codes they can also be recorded here.
Other project specific information is listed below
Color: The Color of the time entry box in week view
Hours Estimate: A time estimate that could be used for budgeting
Contact Name, Email and Phone: Can be used to store project related info
You can also Add Subprojects to projects using this screen. Simply enter the sub project name into the “Add Sub Project” box and click the Add button. You can then select the sub project in the project list and add any custom info for the sub project.
Time Entries Screen
On the projects Time Entries screen you will find a list of all time entries associated with the selected project and time entry details including Date, Start Time, Stop Time, Duration, Comments as well as a running total of time tracked against this project. You may edit time entries from this screen by double clicking on a time entry.
To manually add a new time entry you can click on the “Create New Entry” button and enter the details. Once saved the new time entry will appear in the list.
All About Time Entries
Time entries are what Klok was really created for...to track your time. There are several different ways to create time entries including using the built in timer, dragging and dropping a project from the project list and manually creating entries while looking at individual projects. Time entries can also be imported from third party software such as Harvest and Basecamp. (See the connectors and plugin section for more info)
Dragging and Droping Time Entries
One of the quickest methods to add a time entry to the Week View is to simply drag a prjoect or sub-project from the project list on the left hand side directly on to the week view screen.
Using the Klok Timer
Klok includes a very useful timer that can track your work on a specific project.
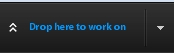
To start the timer you can drag and drop a project from the projecct list to the “Drop here to work on” button at the top of the klok window. ( see the below image)
![]()
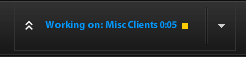
Once you have started a timer the image will turn to “Working on [project name] 0:05”.
The timer will start at 0:05 minutes to allow you to see the entry in the week view window. If you leave the timer running it will not increase until to get to minute 0:06, at which point it will track time to the minute. If you stop the timer under 5 minutes the time entry will record the time to the nearest minute and not the 0:05 minute mark.
You can start a previously worked on project by clicking the drop down arrow next to the “Drop here to work on”. You will be displayed a list of the recent projects or all projects.
To stop the timer you can click on the small orange square next to the project name. See the above image. Note this may be adjusted to make it more recognizable as a stop button in future versions.
Manually Creating Klok Time Entries
More Info Coming Soon...
Editing Klok Time Entries
To edit a Klok time entry you can double click the time entry in the week view to display the property window for that entry. The time entry property window will display at the botton of the week view window.

You can change time entry details such as Date, Start Time or End Time. You can also add comments for the selected time entry. These comments will display on your times sheets. If you made a mistake and need to change this time entry’s Project you can click the link “Change Project” to select a differenet project.
You may also edit a Time Entry by double clicking on the Project in the left pane of Klok and then selecting the Time Entries tab. You can then double click a time entry to display the same Properties windows as shown above.
Deleting Klok Time Entries
To delete a time entry you can click on the time entry you would like to remove and either drag it to the trash can in the bottom left hand side of Klok or you can right click the time entry and choose Delete. It you accidentally deleted a time entry you will have the ability to “un-delete” it by retrieving it from the trash can.
Using Templates
Klok templates allow you to create projects more quickly and give you a predefined set of subprojects. Klok includes two template, a “web project” and a “branding project”.
These templates include several subprojects that will help you organize your tracked time.
To create a project bassed on a template:
- Click on the “From Template” button in the left hand side of Klok
- Select the template from the drop down list of available templates
- If desired you can customize the new projects options
If one of our predefined templates does not fit the way you work you have the option of turning any project (and subprojects) into your own template.
To create a template:
- Create a new project
- Create any subprojects as required
- Right click on the new project from the project list in the left hand side of Klok
- Choose “Save as Template”
The new template will be available in the template list.
Tracking Your Time
To start the timer for working in a project you can ...
Week View
Week View is the main area where you can visualize your day as fills up. Your tracked time will appear as regions that match the colors of the Projects that are worked on. Depending on how much time is spent on each entry you may see the Project Name in the displayed entry.
You can view past or future weeks you can use the forward or back arrows at the top of the Week View window.
To adjust the size of the entry you can use the sliders on the right hand side to zoom in or out to view a smaller or larger part of the day.
More Info Coming Soon...
Dashboard View
More Info Coming Soon...
Project View
To access more information about a particular project you can click on the Project View button at the top of the Klok window. In this view you will see tabs for project specific information. These tabs are covered in the Projects section above
Preferences
The Preferences screens, located on the Tools Menu, are where most of the Klok setting customizations are made. Once you change a setting you should see the change immediately and should not need a restart of Klok.
General
On the General tab of the Preferences Screen you have the option of setting several options. These options include License Key, Data File Location, New Time Entries Duration, and First Dat of the Week
License Key
Klok is available in two version currently. A Free version and a Paid Pro version. You can upgrade your free version by purchasing a license key from www.getklok.com. You will receive an automated email with your license key.
When you enter your license key Klok will upgrade itself to the Pro version and enable some advanced and enhanced features if Activation is successful. NOTE: You must be connected to the internet to Activate your license key. We track each activation to combat software piracy.
For an up to date comparison of the two version please visit www.getklok.com.
Data File
By default Klok saves its data to a folder inside your user profile on your pc. If you would like to move your data file you may choose a new path from the File Location box. This could be useful to save your Klok data to a USB key or a network share for backup reasons. To set your data file location back to the original location you can click the “Use Default Location” button.
Klok allow you to export your project tree as an XML file. The file will be placed in the same location as your data file. To export and XPM representation of your project tree click the “Export Project Tree” link under the data file location box. This could be used to tie Klok in with a third party system. For more information please see www.getklok.com.
New Time Entries
The New Time Entry duration is the amount of time that a time entry will span when you drag a Project (or sub-project) from the project tree on the left hand side of Klok and drop it into Week View. This setting is in minutes.
First Day of Week
This setting allow you to set what day of the week will display in week view.
Formatting
On the formatting tab of the Preferences Screen you have the option of setting several options. These options include the Time Format, Date Format, Timesheet Duration TimeFormat and Number of Recent Project to remember
Time Format:
12 Hour Mode or 24 Hour Mode. For example 1:00PM or 13:00
Date Format:
The date format optipons allow you to pick your favorite date format. Options include MM/DD/YYYY or YYYY-MM-DD or DD/MM/YYYY.
Timesheet Duration Time Format:
This option is allows you to see time durations in time format 2:45 or decimal format 2.75 (Both represent 2 hours and 45 minutes)
Recent Project:
This option sets the specified number of projects to remember in for use with the “Drop here to work on” button.
Snapping
On the Snapping tab of the Preferences Screen you have the option of setting several options. These options include Auto-Snapping and the Snapping constraint time in minutes. Snapping makes it easier to drag and drop or move time entries in Week View.
Auto-Snapping:
This setting will enable or disable the auto snapping feature of Klok
Snapping Constraint:
This feature allows you to set the time increment for snapping. For example a setting of 15 will cause your time entries to snap to the nearest 0, 15, 30 , 45 past the hour.
Appearance
On the Appearance tab of the Preferences Screen you have the option of setting several options. These options include Klok Skin and the Minimize Behavior.
Skin:
Klok comes with several built in Skins in the Pro version. The included skins are Night, Day Blue, Day Green and Day Red.
Minimize Behavior:
If you would like to change the minimize behavior to Minimize to the Task Tray in windows you can choose this option.
Updates
On the Updates tab of the Preferences Screen you have the option of setting if Klok will automatically check for updates. We recommend leaving this setting checked. As we release updates frequently, this will allow you to get the most recent version as soon as possible.
On this screen you will also see the time of the last update check as well as a link to manually “Check for Updates”
Plugins
Plugins and Connectors allow you to extend Klok (Pro version only) by adding capabilities that were not built in to the base version of Klok. To install a plugin or connector you can download it from our http://www.getklok.com/products.html. The file will be a zip file. You do not need to unzip it. Once the file is downloaded click on the “Install Connector Plugin” from the Plugins Preferences screen. You will be presented with a file browse window where you can select the plugin you previously downloaded.
The Plugins screen will list all the currently installed plugins. To un-install a plugin you can click the un-install link.
Timesheets
On the Timesheets tab of the Preferences Screen you have the option of setting the format for your time sheets. The options include XLS, CSV or HTML timesheets. NOTE: If you select CSV the time entry comments will be stored in a separate HTML file.
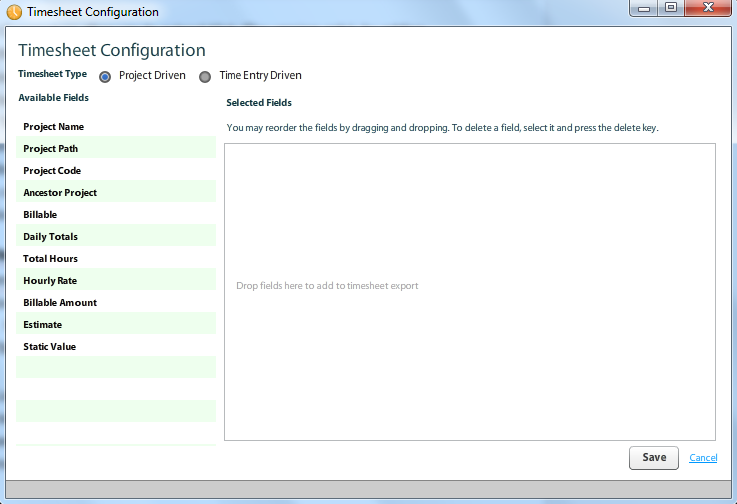
Timesheet Layout
On the this screen you will find the link to the Time Sheet Layout configuration. You now have the ability to custom configure the timesheet layout. There are options for making Project Driven or Time Entry Driven timesheets.
Backups
On the Backups tab of the Preferences Screen you have the option of setting the location to store your backup files as well as enabling or disabling automatic backups. Next to this setting there is an option to set the backup frequency in days.
From this screen you also have the option to run a manual backup or Restore from a previous backup. Klok stores its files with a .KLOK extension. Another method of performing a restore is to simply find the backup file you would like to restore and double click the file. Klok will start a wizard that will restore that backup file.
The backup location text box is the location that the backup files will be saved. You may used the default location that will store the files in a “\backup\” folder at the same location of where your data file (unless you are using a custom data location) resides. Changing this setting could be used where you would like your backup files to be saved to a separate disk or network path. In the event of a disk failure on the disk where you data file is stored you will have not have lost the backup files as well. To switch back to the default location you can click the “Use Default Location” button to reset the file path.
On the Backup Preferences screen you will also see the Date and Time of the last backup as well as the next scheduled backup if the automatic backup is selected.
Startup Options
To have Klok start when you login ckeck the “Start when user logs in” check box.
Archiving Projects
More Info Coming Soon...
Importing Data
Google Calendar
Klok supports importing your Google Calendar items. To import from Google Calendar you can open the Google Calendar option window buy clicking on “Google Calendar” from the Import from drop down box in the top right of the Klok Interface.
![]()
You will then see the following pop up window.
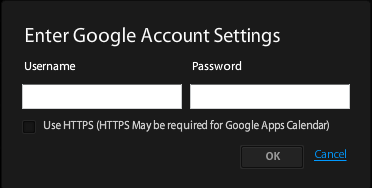
You can simply enter your google user name and password. If you use Google Apps Calendar (which is different than the regular Gmail Calendar) you may need to check the “Use HTTPS” check box depending on how your Google Apps account is configured. Once Klok makes a successful connection to Google’s servers you will be presented with.
NEED SCREEN SHOT HERE
To add a calendar item to Klok you can click the Project you would like to attach the project to and then click the calendar item. It should then appear in your Klok Week View.
Exchange Server
More Info Coming Soon...
Previous Week
You can import a duplicate copy of the previous weeks time entries. This is useful if you have re-occurring meetings or generally work on the same projects for multiple weeks in a row.
Exporting Data
More Info Coming Soon...
Backing Up Your Data
![]()
More Info Coming Soon...
Time Sheets and Reports
More Info Coming Soon...
Graphs
More Info Coming Soon...
Klok Connectors
There are several connectors available for Klok currently with more planned. Connectors are meant to allow you to integrate other systems into Klok by “syncing” data between systems. See below for the list of connectors currently in development and how to use each one. To install a plugin see the Plugin Section of this manual.
Harvest Connector
The Harvest Connector is currently in beta and available for download here.
Basecamp Connector
The Basecamp Connector is currently in beta and available for download here.
FreshBooks Connector
The FreshBooks Connector is currently still in development. Please check www.getklok.com for release announcements and other info as it becomes available
Paymo Connector
The Paymo Connector is currently still in development. Please check www.getklok.com for release announcements and other info as it becomes available
Klokwork Team Connector
The Klokwork Team Connector allows you to setup your project lists and share them among your entire team. Each team member can submit timesheet data to a centralized location for further reporting. Using this connector, you can integrate Klok with your existing time tracking system.
Other Connectors
If you have suggestions for other connectors please post them in our forums or send an email to support@getklok.com. We are always looking for more ways to make Klok useful.
Klokwork Team Console
The Klokwork Team Console is currently in beta testing. It is available for download at http://getklok.com/KlokworkTeamConsole.html. Further updates and documentation will be released for the Console shortly.
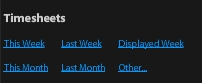
Creating and Exporting Time Sheets
Klok contains several methods of exporting time sheets.
Known Issues
More Info Coming Soon...
Troubleshooting
To troubleshoot most problems we first recommend downloading the latest version of Adobe Air and the lastest version of Klok. If you continue to have issues please try the following.
- Take a backup copy of your Klol.db file
- Take a backup of your config.xml file
- Delete or rename the above two files and restart Klok
- If Klok starts without a problem the problem is most likely due to an error in one of your data files.
- At this point you may need to open up a ticket with our Support Team. They may request that you send them your files for review.
- Please provide as much of the follwing information as you have. ( Operating System, 32 or 64 bit OS,current Adobe Air version, current Klok version, network user or stand alone user, do you have a backup of your klok.db file)
Support
Support for Klok is available is several places.
You may browse our user forums at http://klok.mcgraphix.com/klok/forum/. There are many users online that are willing to answer questions for other Klok users. There is a seach available at the forum so if you can’t find what your looking for please try the search.
We also have an FAQ section at http://www.getklok.com/faqs.html.
We are also are working on a search-able knowledge base at http://support.getklok.com/
You may also open up a support ticket at http://support.getklok.com/. One of our support technicians will work with you to try and resolve your problem.
We have posted many How-to Videos on our youtube channel as well at: http://getklok.com/videos.php
Index
More Info Coming Soon...